LegacyLink User Guide
 This image was generated by Midjourney
Welcome to LegacyLink! 👋
LegacyLink is your all-in-one family contact and event management solution, combining the speed of keyboard (CLI, standing for Command Line Interface) commands with the convenience of a modern interface.
Perfect for managing both small, close-knit families and large extended family networks!
🎯 Key Features
| Feature Category | What You Can Do |
|---|---|
| 👥 Contact Management | • Store family contact details • Organize by relationships • Quick search and updates |
| 📅 Event Planning | • Schedule family gatherings • Track event attendance • Manage event details |
| ⚡ Smart Interface | • Fast keyboard commands • Visual contact lists • Automatic saving |
🚀 Quick Start Guide
1. System Setup
- Download and install Java 17 from the Java downloads page.
- To check if Java is correctly installed:
- Open your computer's command prompt/terminal
* Windows: Press
Win + R, typecmd, and press Enter * Mac: OpenTerminalfrom Applications- Type
java -versionand press Enter - You should see a version number 17, something like the image below.
- Type
- Open your computer's command prompt/terminal
* Windows: Press

2. Download LegacyLink
- Get the latest version (.jar file) from our releases page.
- Specifically, look for a file named
legacylink.jarand click on it to download. - Save it in a folder where you want to store your LegacyLink data.
- Ideally, this should be new folder specifically for LegacyLink.
3. Launch the Application
Get your folder path:
- Open the file management application (i.e. file explorer for Windows, Finder for MacOS).
- Navigate to the folder containing the
jarfile. - Copy the path from the address bar.
Open your command prompt/terminal (see instructions above).
Navigate to your LegacyLink folder:
- Type
cdfollowed by a space - Windows: Type your folder path (e.g.,
cd C:\Users\YourName\LegacyLink) - Mac/Linux: Type your folder path (e.g.,
cd /Users/YourName/LegacyLink) - Pro tip: You can alternatively drag and drop your folder into the terminal after typing
cd(with a space) to automatically fill in the path!
- Type
Run LegacyLink by typing:
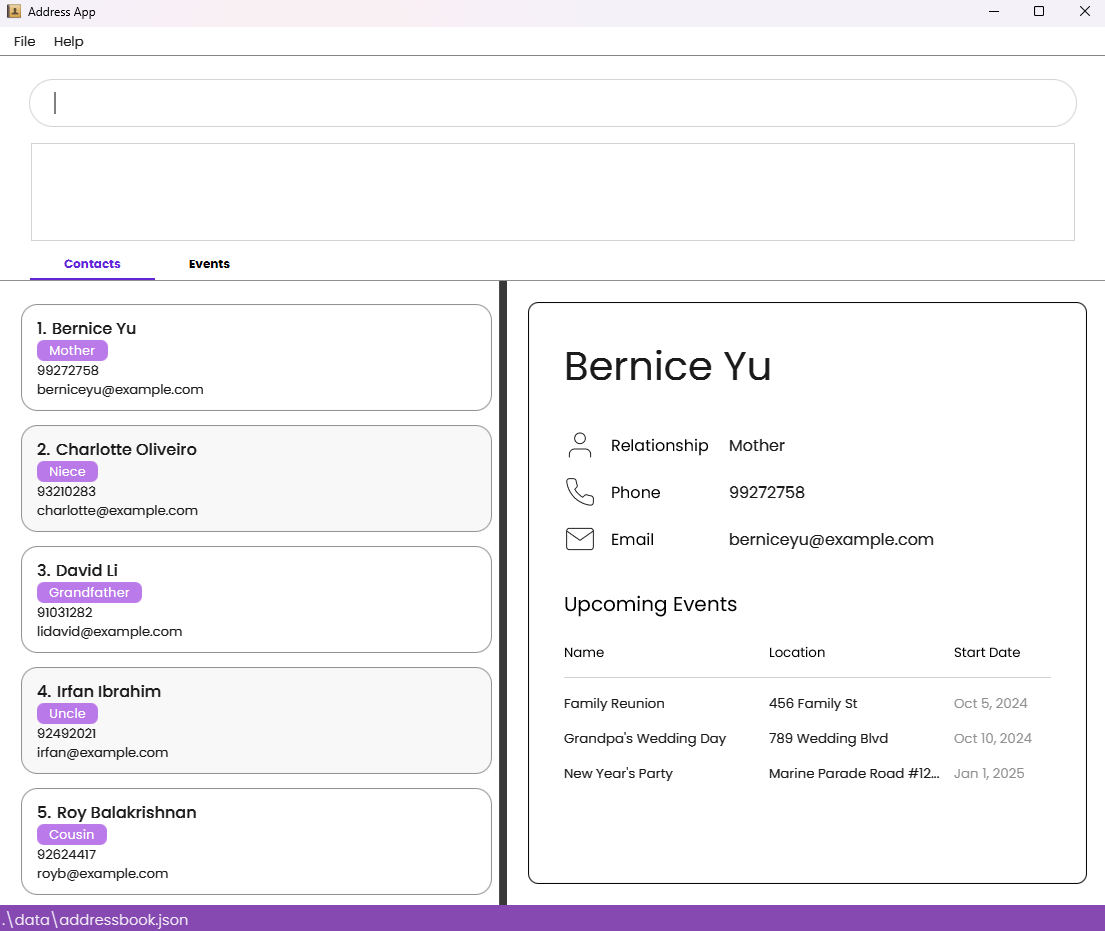
java -jar legacylink.jarPressing enter will open up the LegacyLink window as shown below!
4. Try These Basic Commands
We've prepopulated LegacyLink with some dummy data for you to play around and get a feel of how LegacyLink works! Here are some simple commands to get you started:
📋 Essential Commands:
----------------------------------------
list -p     → Show all your contacts
list -e     → Display all events
help        → View all available commands
Ready to explore more features? Continue reading our features overview below in the what can you do with LegacyLink section or navigate to the deepdive section, where we break down each command in detail!
🎯 What Can You Do With LegacyLink?
Our primary features include the following:
📱 Essential Contact Features
| Feature | Description | Command |
|---|---|---|
| Add Contacts | Create new family contact entries | add -n NAME -p PHONE -e EMAIL -rs RELATIONSHIP |
| View Contacts | See your full contact list | list -p |
| Search | Find specific family members | find KEYWORD |
🎉 Event Management
| Feature | Description | Command |
|---|---|---|
| Schedule Events | Create family gatherings | event -n NAME -sd DATE -ed DATE -l LOCATION |
| Add Attendees | Include family members in events | event ... -a ATTENDEES |
| View Events | See all scheduled events | list -e |
✏️ Update & Modify
Keep your information current with these features:
Contact Updates
- Edit contact details
- Update relationships
- Modify phone numbers/emails
Event Changes
- Reschedule dates
- Change locations
- Update attendee lists
- Modify event names
🗑️ Cleanup & Organization
Manage your data efficiently:
Contact Management
- Remove single contacts
- Clear all contacts
- Organize by relationships
Event Cleanup
- Cancel individual events
- Clear all events
- Remove specific attendees
Refer to the feature list below for detailed information of each command that is available in LegacyLink.
📚 Features Overview
Contents
Using This Guide:
- Commands are case-sensitive (
helpworks,Helpdoesn't)- Words in
UPPER_CASEare values you provide- Parameters can be in any order
- For example, if the command specifies
-n NAME -p PHONE_NUMBER,-p PHONE_NUMBER -n NAMEis also acceptable.- Extraneous parameters for commands that do not take in parameters (such as
helpandexit) will be ignored.- If you are using a PDF version of this document, be careful when copying and pasting commands that span multiple lines as space characters surrounding line-breaks may be omitted when copied over to the application.
General Commands
Get Help 💡
Format:
help
- Shows a message (pictured below) with the link to access this user guide.
- Use anytime you need assistance.

Save Your Data 💾
- All changes are saved automatically
- No manual saving needed
- Data is stored in your LegacyLink folder
Exit LegacyLink 👋
Format:
exit
- Closes the application
- All data is automatically saved
⚠️ Warning: No confirmation message is displayed.
Editing The Data File
LegacyLink data are saved automatically as a JSON file [JAR file location]/data/addressbook.json and [JAR file location]/data/eventbook.json. Advanced users are welcome to update data directly by editing that data file.
Caution:
If your changes to the data file makes its format invalid, LegacyLink will discard all data and start with an empty data file at the next run. Hence, it is recommended to take a backup of the file before editing it.
Furthermore, certain edits can cause the LegacyLink to behave in unexpected ways (e.g., if a value entered is outside the acceptable range). Therefore, edit the data file only if you are confident that you can update it correctly.
Managing Contacts
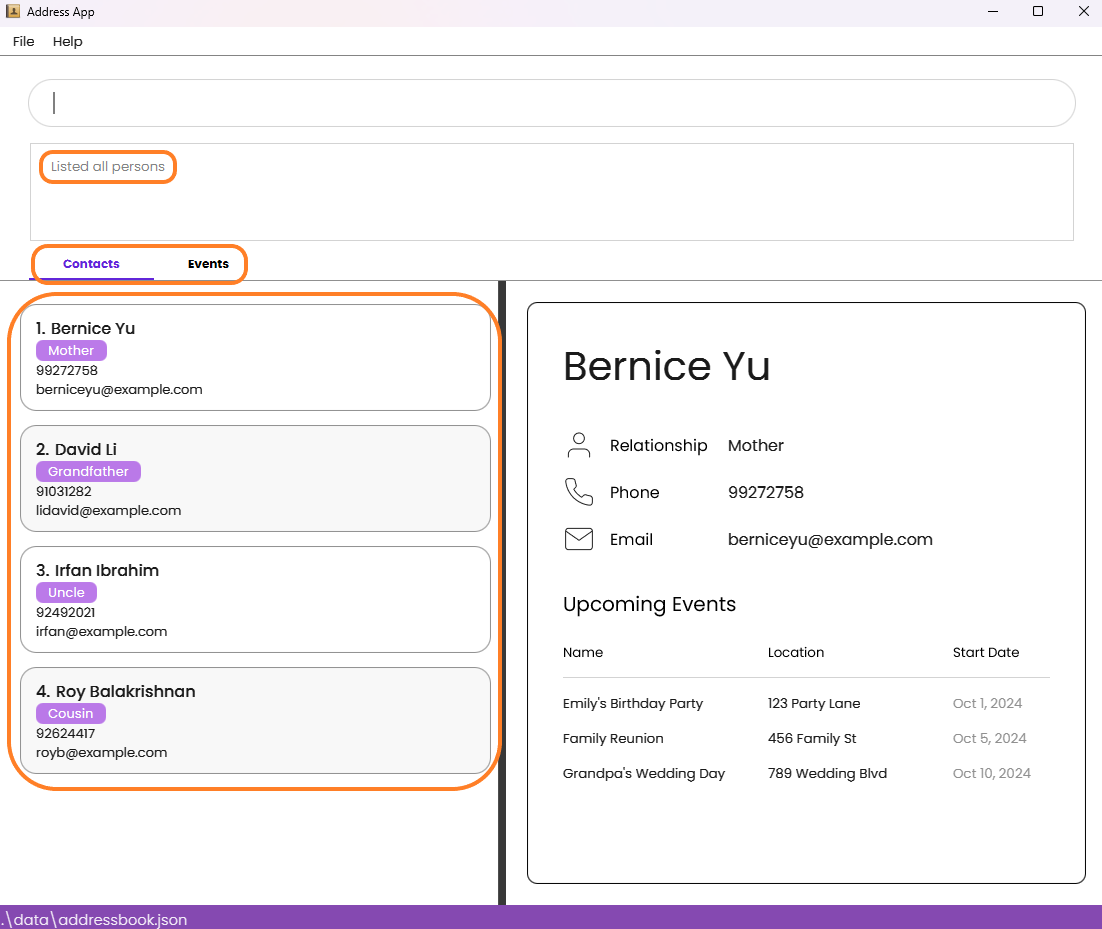
View Your Contact List 👥
list -p
- Shows all your family contacts in one view
- Use this to check contact details or before using other commands
Tip: Preceding, trailing and intermediate whitespaces will still result in a successful command.
Add a New Contact ➕
Format:
add -n NAME -p PHONE_NUMBER -e EMAIL -rs RELATIONSHIP
- Adds a person to the address book.
- All parameters
NAME,PHONE_NUMBER,EMAIL,RELATIONSHIPmust be present. - If you want to use special characters such as
d/oors/oinname, please omit the/and entersoanddoinstead.
Rules to Remember:
| Field | Requirements |
|---|---|
| Name | • Letters, numbers, and spaces only • Cannot be blank |
| Phone | • Minimally 3 digits |
| • Must be valid email format (example@domain.com) | |
| Relationship | • Letters only • Cannot be blank • Note: Please enter a meaningful relationship that best describes the connection (e.g., "Friend," "Colleague," "Sibling"). |
Note: Names which are very long may not be fully displayed in the detailed person view, as displaying it would
compromise the aesthetic of the User Interface and overall user experience.
The person can still be identified through
other information such as their phone number, email, and relationship. Additionally, relationship tags are case-sensitive.
Valid Example:
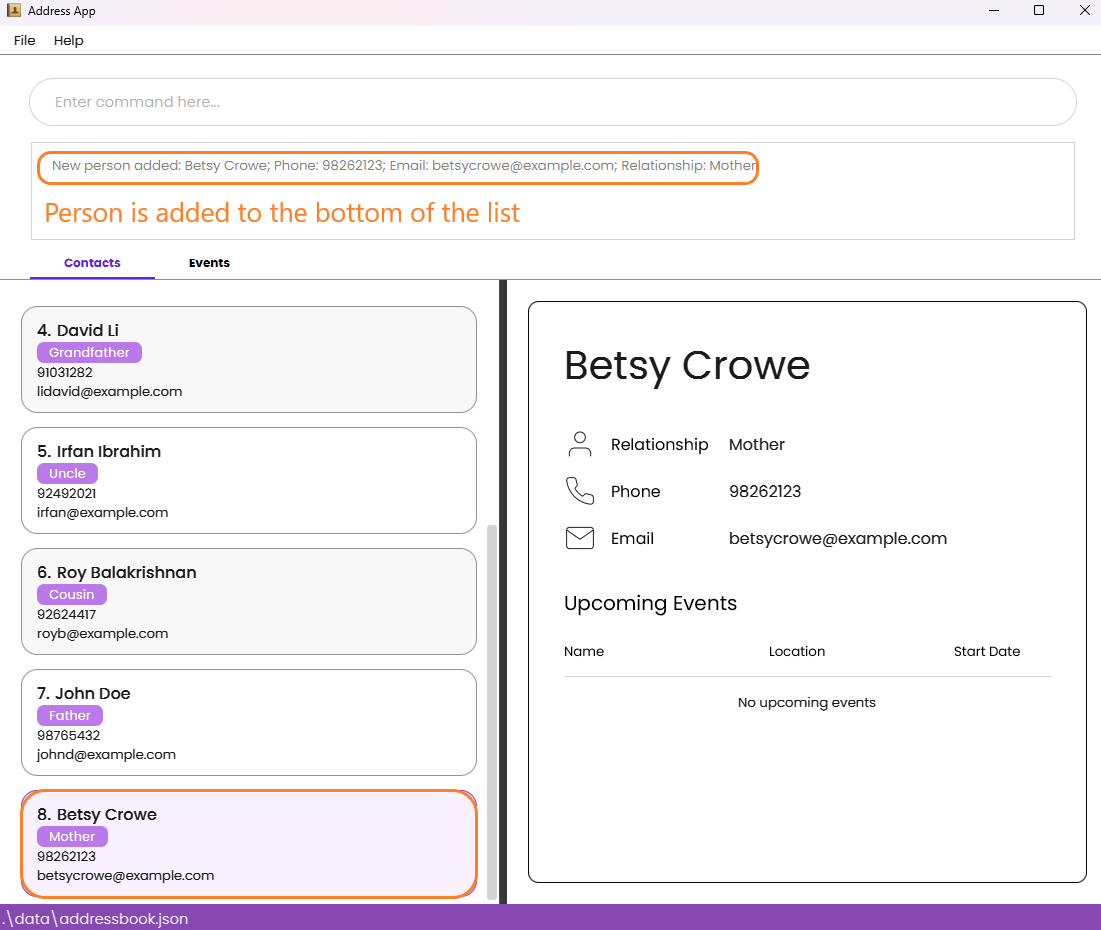
add -n Betsy Crowe -rs Mother -e betsycrowe@example.com -p 98262123
- This command adds a person named Betsy Crowe with the phone number 98262123, email betsycrowe@example.com, and the relationship Mother to the address book.
Invalid Example (Invalid Phone Number):
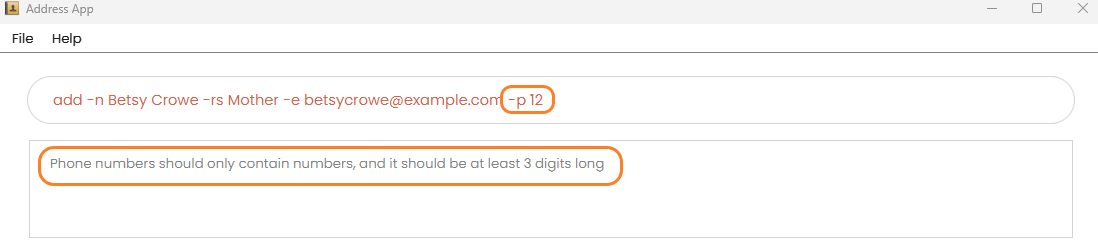
add -n Betsy Crowe -rs Mother -e betsycrowe@example.com -p 12
- This command will result in the following error message since the phone number must be at least 3 digits long.
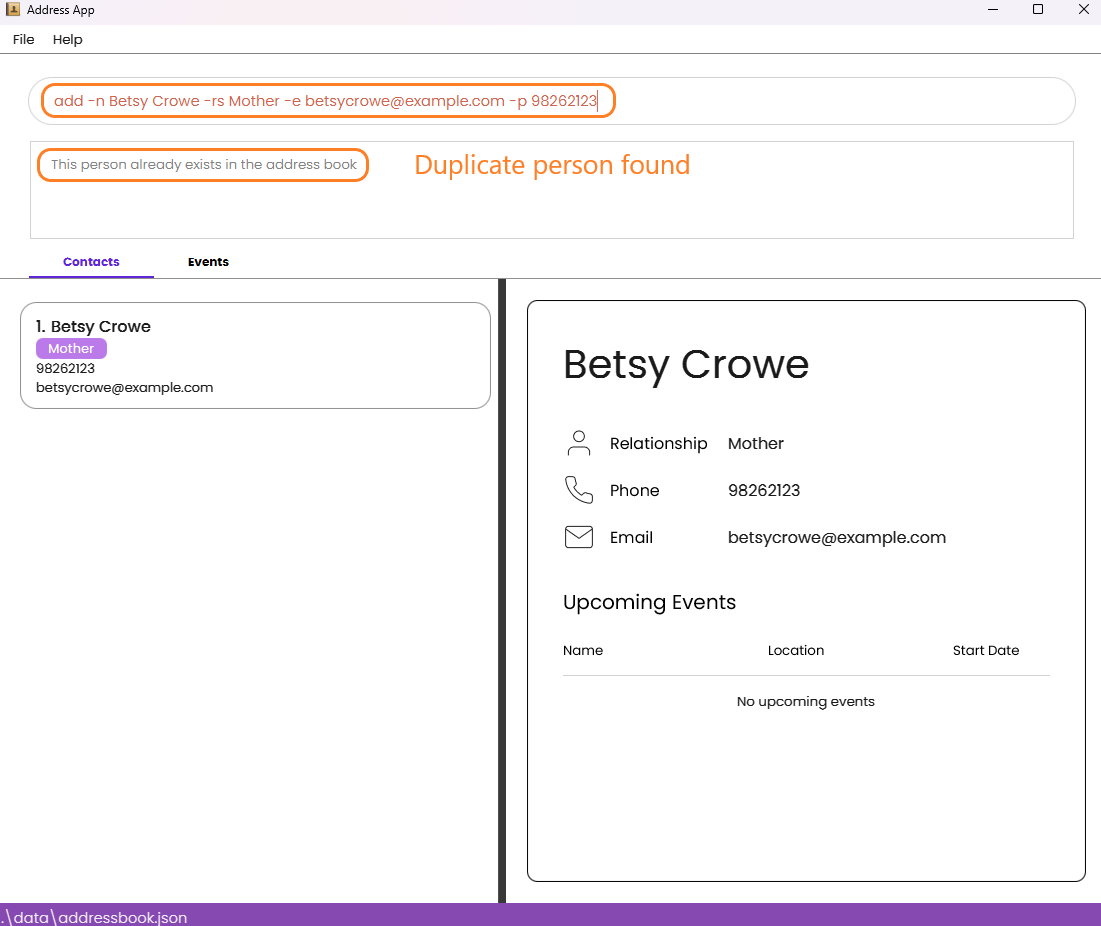
Invalid Example (Duplicate Persons):
- Assuming the contact
add -n Betsy Crowe -rs Mother -e betsycrowe@example.com -p 98262123already exists. - Typing the following command
add -n Betsy Crowe -rs Mother -e betsycrowe@example.com -p 98262123will result in a duplicate entry and the person will not be added. - The following error message will be shown:
Edit a Contact 📝
Format:
edit INDEX [-n NAME] [-p PHONE] [-e EMAIL] [-rs RELATIONSHIP]
- Edits an existing person in the address book.
Tips:
- Edits the person at the specified
INDEX. The index refers to the index number shown in the displayed person list. The index must be a positive integer 1, 2, 3, … - At least one of the optional fields must be provided.
- Each of the optional fields can only be specified at most once.
e.g.edit 1 -n Carmen -n Betsyis an invalid command. - Existing values will be updated to the input values.
- If you want to use special characters such as
d/oors/oinname, please omit the/and entersoanddoinstead.
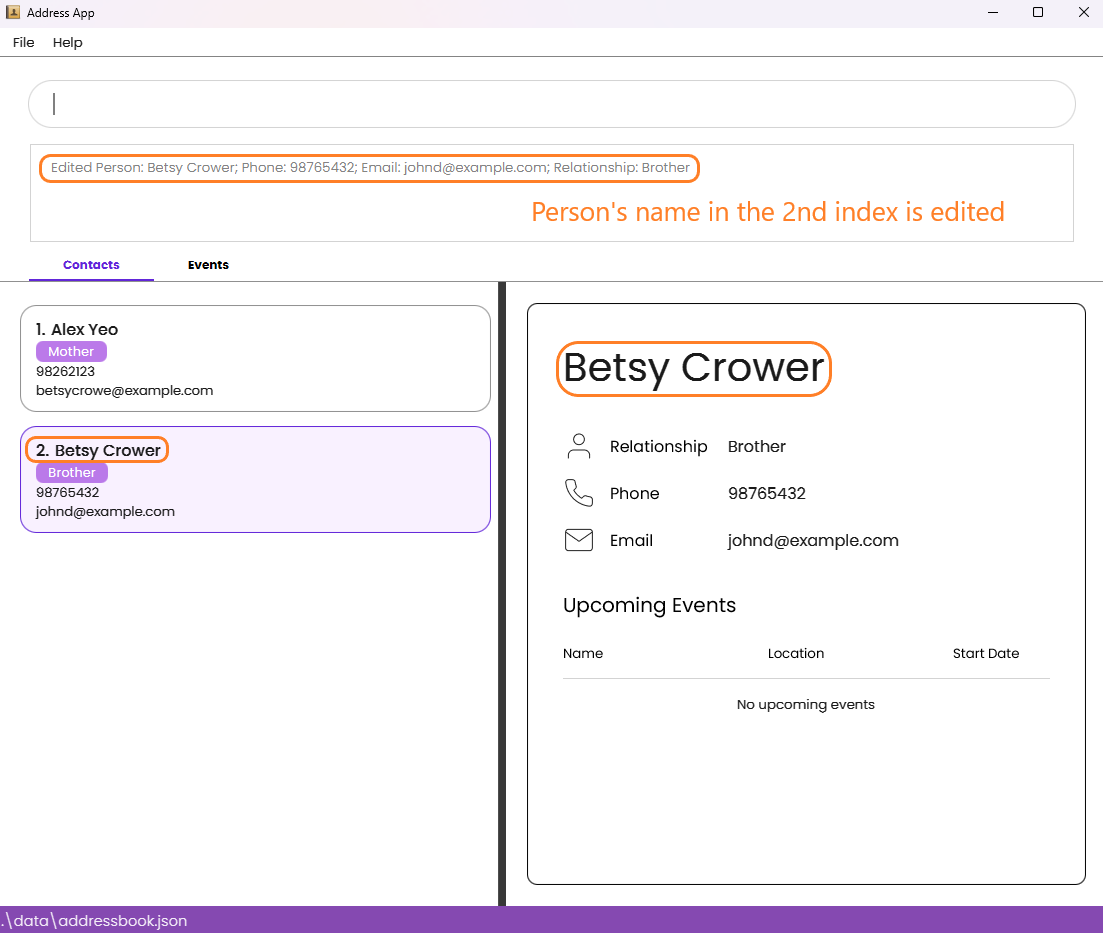
Valid Example (One field edited):
edit 2 -n Betsy CrowerEdits the name of the 2nd person to beBetsy Crower.- Note: this assumes that the address book contains at least 1 person.
Valid Example (Multiple fields edited):
edit 1 -p 91234567 -e johndoe@example.com -rs FatherEdits the phone number, email and relationship of the 1st person to be91234567,johndoe@example.comandFatherrespectively.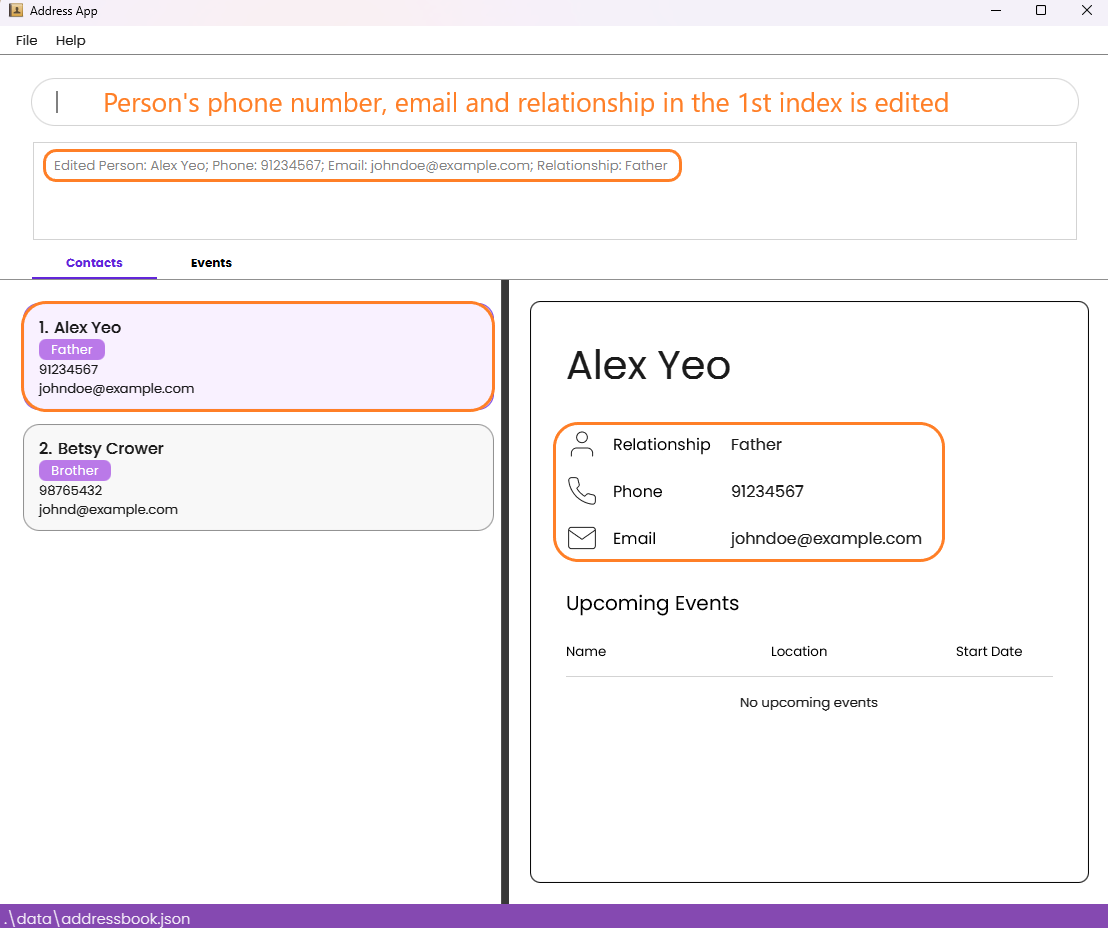
Invalid Example:
edit 1- This command will result in the following error message since at least one of the optional fields must be provided.

Invalid Example (Multiple parameters):
edit 1 -n Carmen -n Betsy -p 12345678 -p 87654321 -e example@email.com -e example@gmail.com -rs Brother -rs Mother- This command will result in the following error message since each value should be edited at most once.

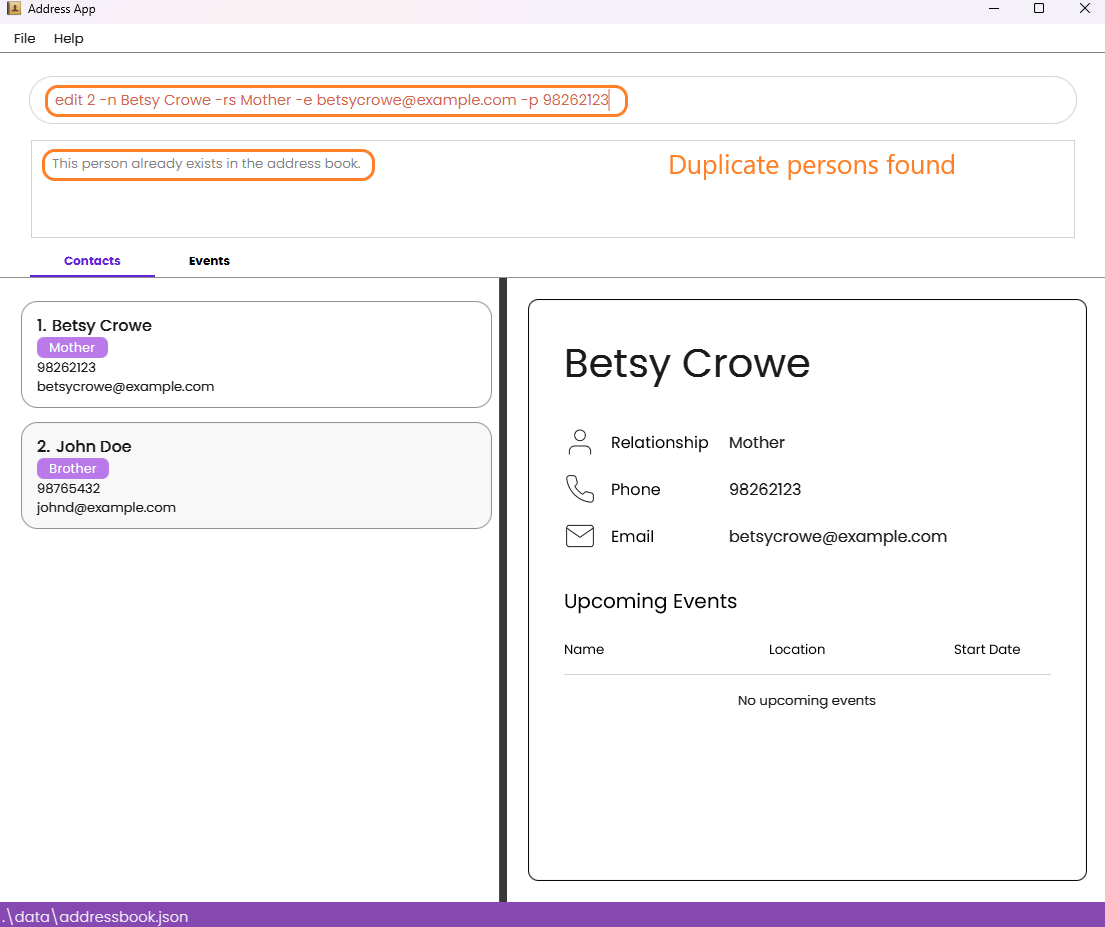
Invalid Example (Duplicate Persons):
- Assuming the contact
add -n Betsy Crowe -rs Mother -e betsycrowe@example.com -p 98262123exists as the first contact. - Attempting to edit another contact:
e.g.edit 2 -n Betsy Crowe -rs Mother -e betsycrowe@example.com -p 98262123will result in a duplicate entry and the person will not be edited. - The following error message will be shown:
Find Contacts By Name 🔍
Finds persons whose names contain any of the given keywords.
Format:
find KEYWORD [MORE_KEYWORDS]
Tip:
- The search is case-insensitive. e.g
hanswill matchHans - The order of the keywords does not matter. e.g.
Hans Bowill matchBo Hans - Only the name is searched.
- Only full words will be matched e.g.
Hanwill not matchHans - Persons matching at least one keyword will be returned (i.e.
ORsearch). e.g.Hans Bowill returnHans Gruber,Bo Yang - If no person is found, none of the contacts will be displayed and
0 Persons Listedis shown to the user. - You are recommended to execute
list -pafterfindcommand to restore the original list.
Valid Example (Found 1 person):
find Johnreturns anyone withJohnas part of their name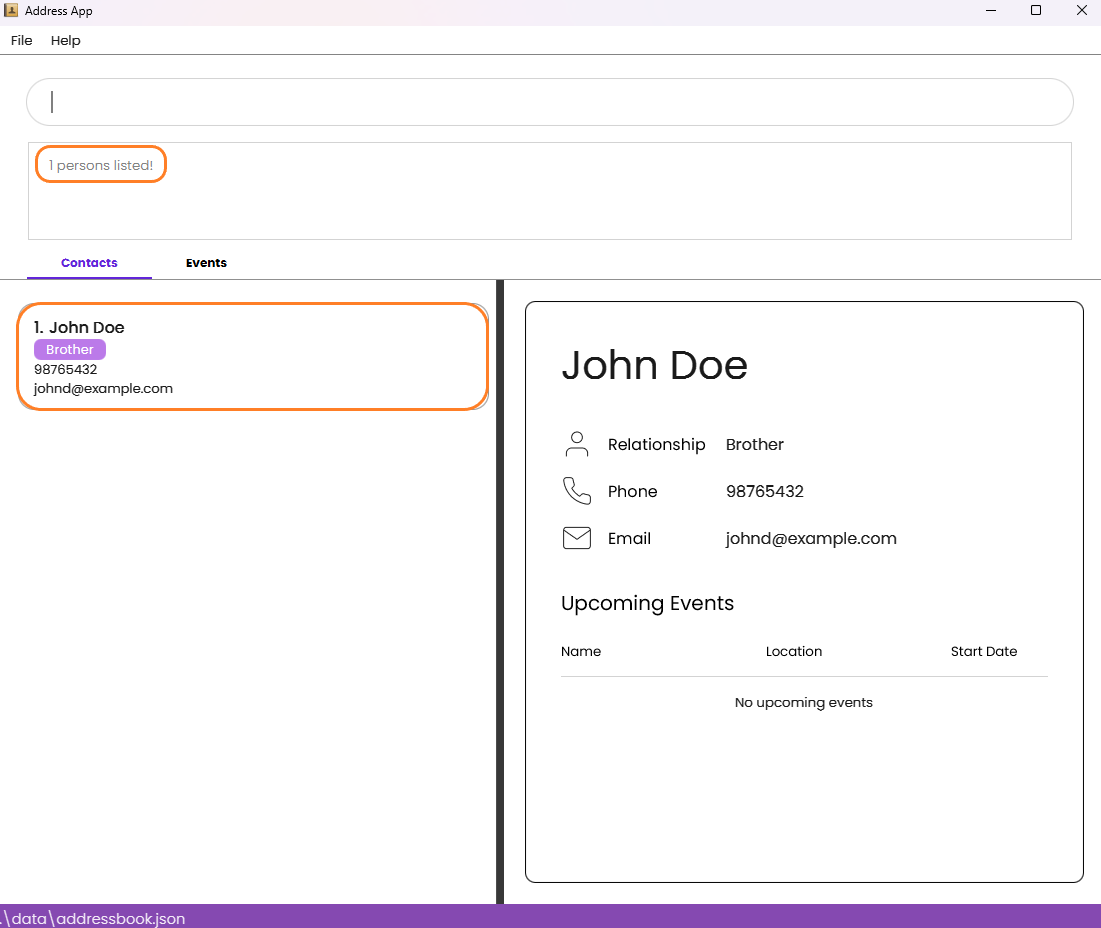
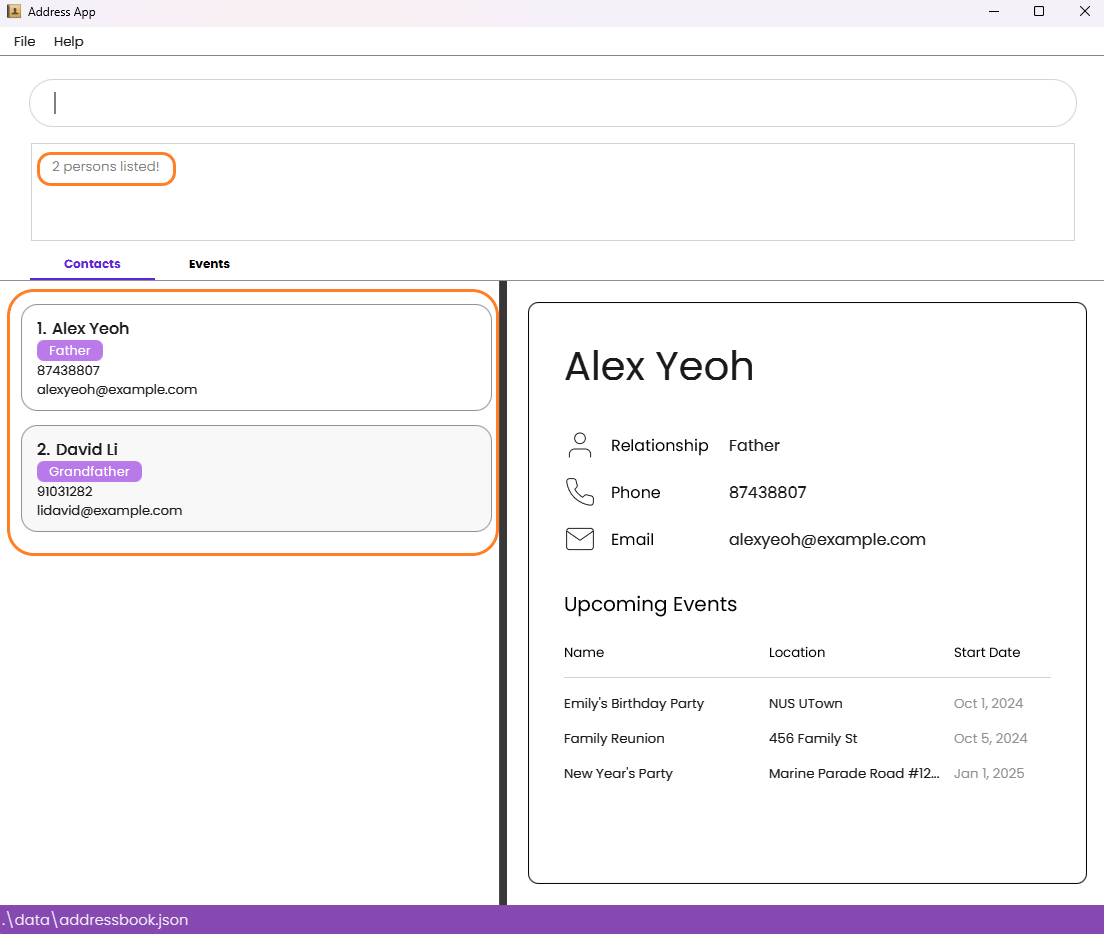
Valid Example (Found multiple person):
find Alex Davidreturns anyone withAlexORDavidas part of their name
Valid Example (Found no person)
find Magnus- Note: since there are no
Magnusin the contact, 0 person is listed.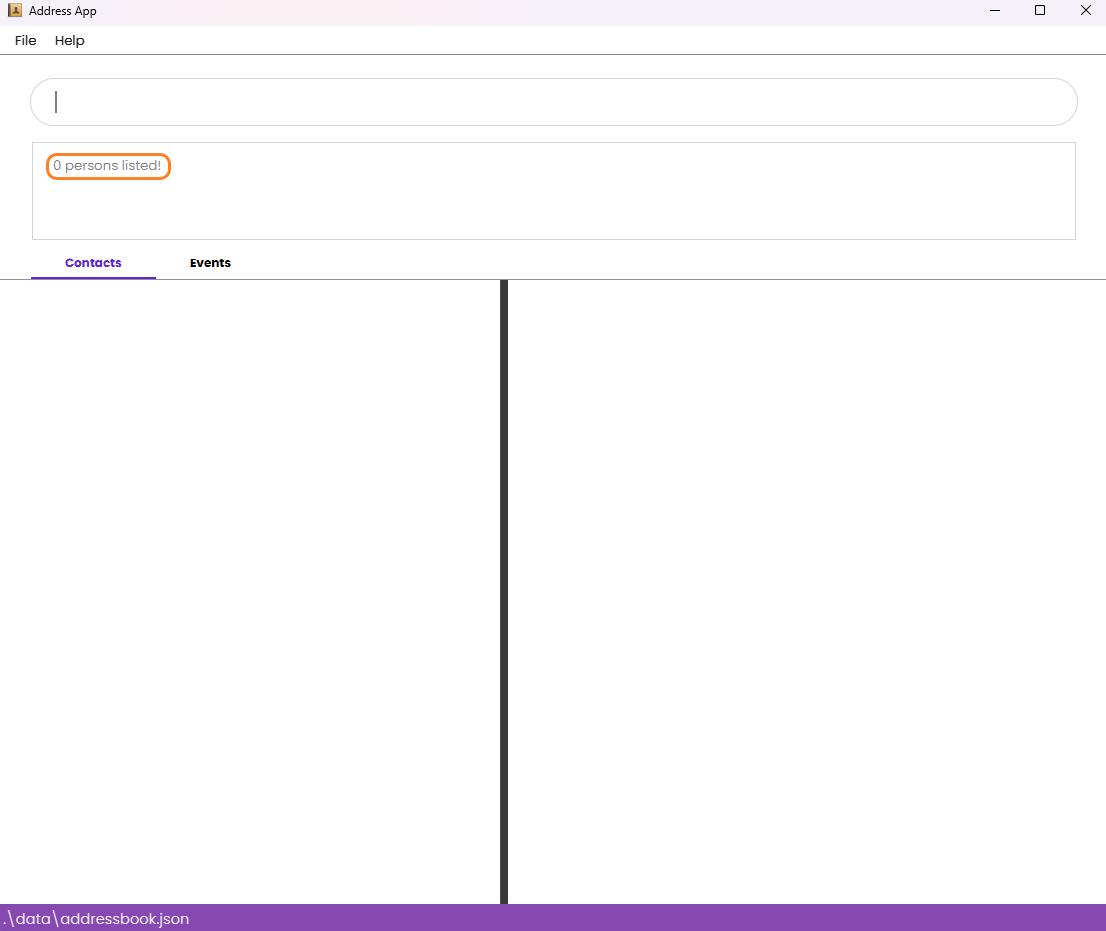
Delete a Contact ❌
Format:
delete INDEX
- Deletes the person at the specified
INDEX. - The index refers to the index number shown in the displayed person list.
- The index must be a positive integer 1, 2, 3, …
⚠️ Warning: This action cannot be undone, no confirmation message is displayed! You will have to use
addcommand to add the contact again.
Valid Example:
list -pfollowed bydelete 1deletes the 1st person in the address book.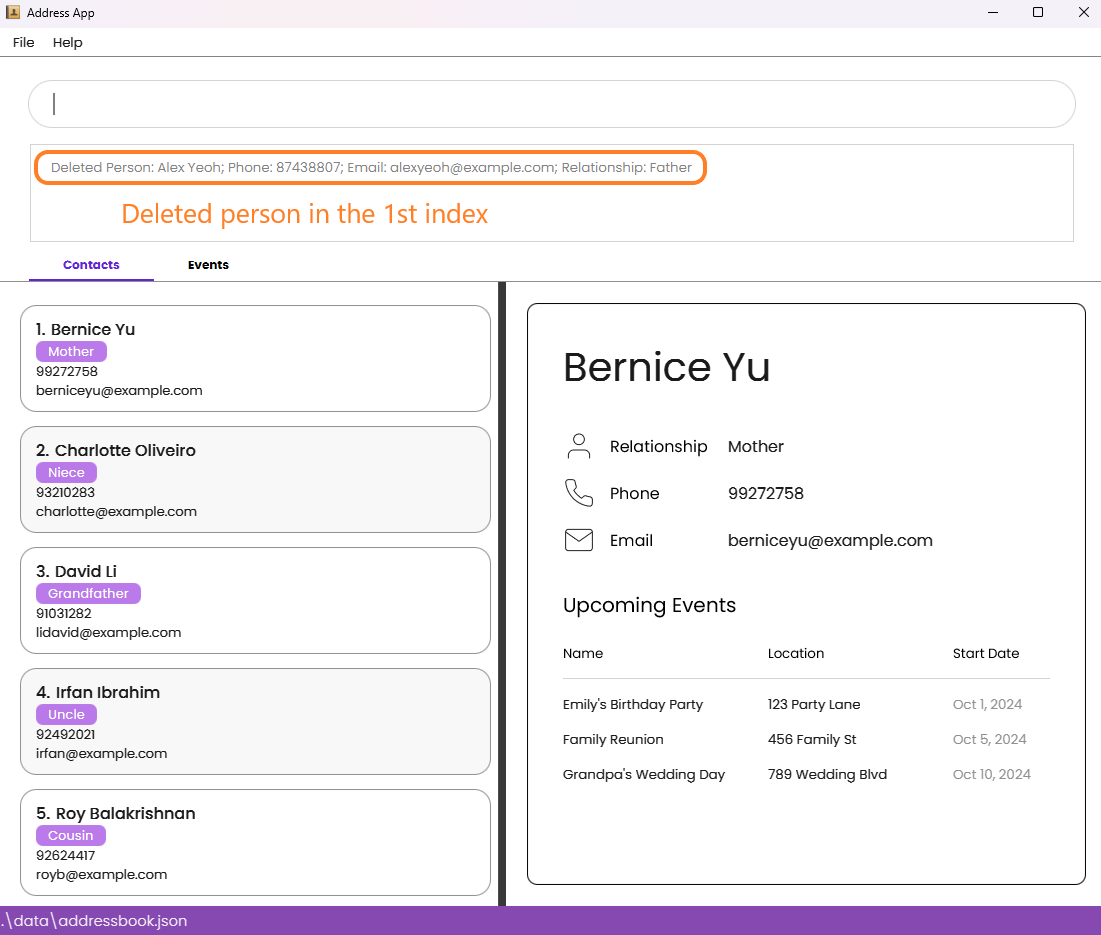
Valid Example:
find Charlottefollowed bydelete 1deletes the 1st person in the results of thefindcommand.- Assumes that only 1 person named
Charlotteis found by thefindcommand.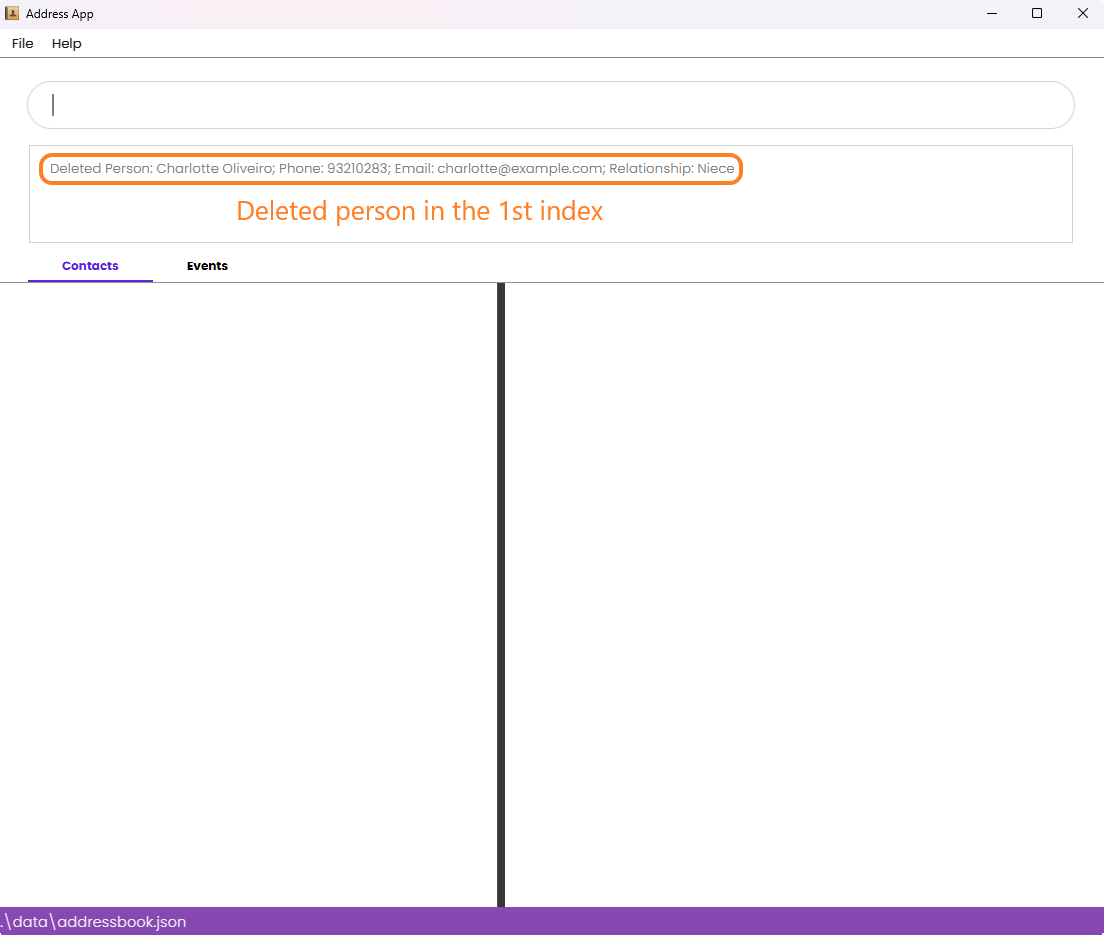
Clearing All Contacts ❌❌
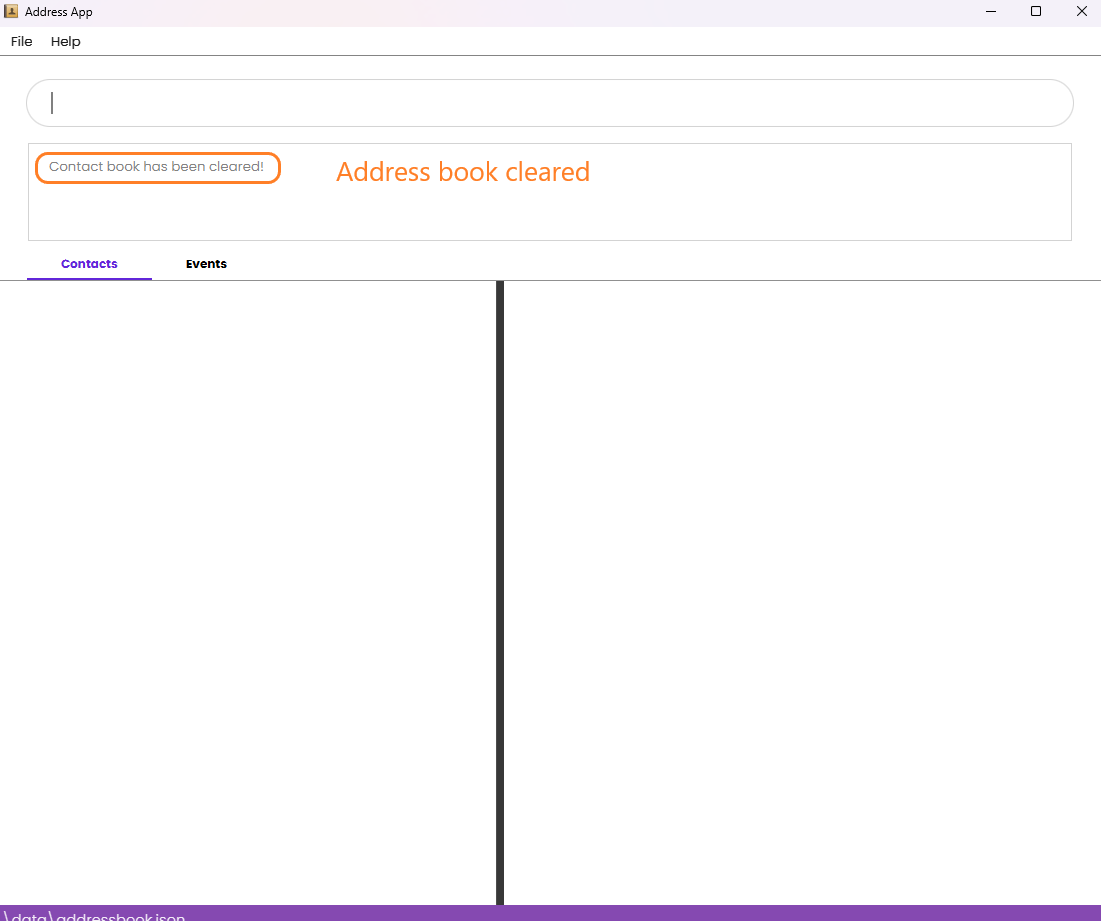
Format:
clear -p
Clears all persons from the address book.
⚠️ Warning: This action cannot be undone, no confirmation message is displayed! You will have to use
addcommands to add all the contacts again.
Organizing Events
View All Events 📅
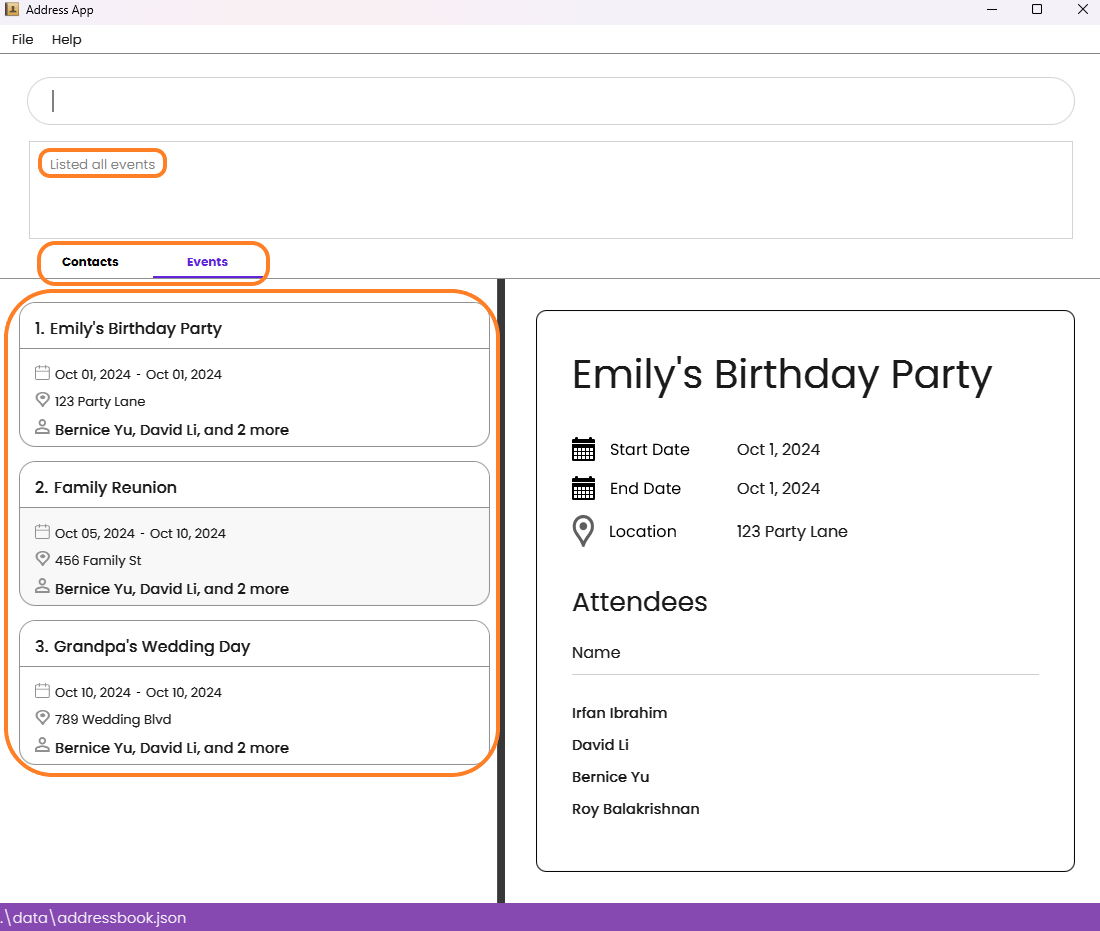
Format:
list -e
- Shows a list of all events in the event book.
Tip: Preceding, trailing and intermediate whitespaces will still result in a successful command.
Create New Event 🎉
Format:
event -n EVENT_NAME -sd EVENT_START_DATE -ed EVENT_END_DATE -l LOCATION [-a ATTENDEES]
- Adds an event to the event book.
- Dates are in (yyyy-mm-dd) format.
Tip:
- All parameters
EVENT_NAME,EVENT_START_DATE,EVENT_END_DATE,LOCATIONmust be present butATTENDEESis optional. - The optional field
-acan only be specified at most once. - Indexes supplied to the
ATTENDEESparameter must be based on existing contacts indexing in the Address Book. Note that the indexes are separated by spaces. - Note: It is an intended feature that you can add events with dates that have already passed. This is so that you can keep track of and archive past events.
Valid Example:
event -n Get Together Party -sd 2023-10-25 -ed 2023-10-27 -l MBS.
Adds a "Get together party" event to the event book.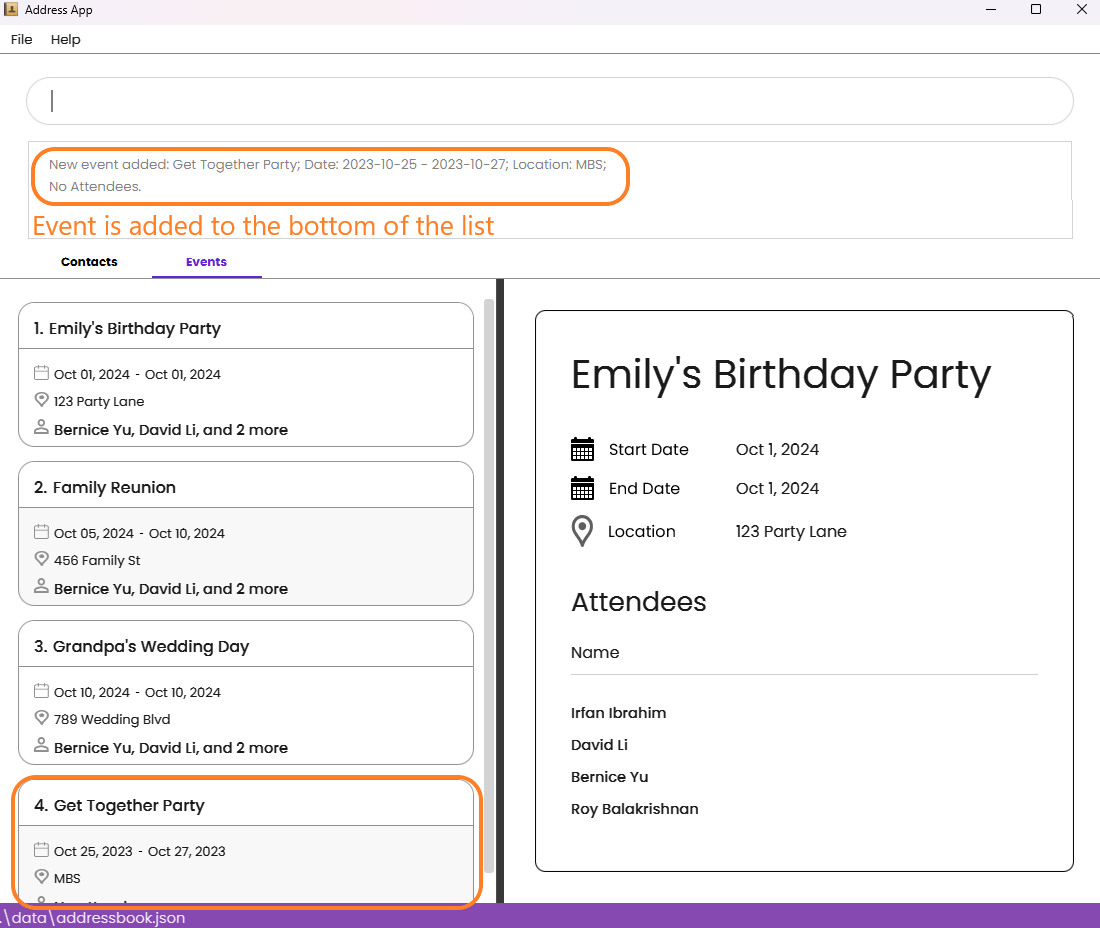
event -n Birthday Party -sd 2023-10-15 -ed 2023-10-15 -l Home -a 1 2 3.
Creates the birthday party event and adds the first 3 people in the contacts book to the event.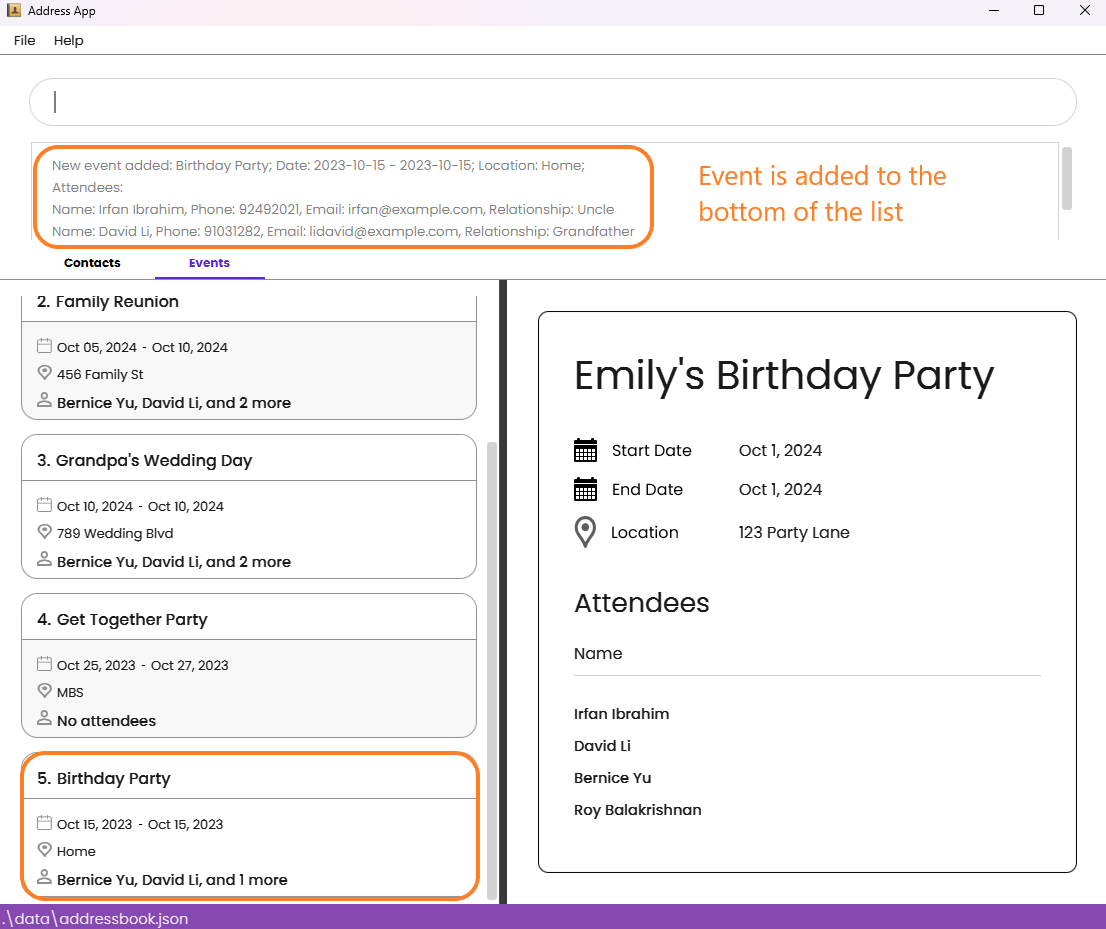
Invalid Example:
event -n Birthday Party -sd 2023-10-15 -ed 2023-10-15 -l Home -a 1, 2, 3- This command will result in the following error message since the list of indexes must be separated by whitespaces, not anything else like commas.

Invalid Example:
event -n New Year's Party -sd 2025-01-01 -ed 2025-01-02 -l Times Square -a 1 2 -a 4 5- This command will result in the following error message since the optional field
-ais specified more than once.
Update Event Details ✏️
Format:
update -i INDEX [-n NEW_NAME] [-sd NEW_START_DATE] [-ed NEW_END_DATE] [-l NEW_LOCATION] [-a NEW_ATTENDEES_INDICES] [-r REMOVED_ATTENDEES_INDICES]
- Updates the details of an existing event in the address book. Note: Dates are in (yyyy-mm-dd) format.
Tip:
- The initial
INDEXparameter is required, while the rest of the parameters are optional. The-rflag allows you to remove attendees from an event, and can be used together with the-aflag. If you add and remove the same index, the result will be adding the person first, then removing them, i.e. they will not be present in the attendee list after the command executes. - Indexes supplied to the
NEW_ATTENDEES_INDICIESandREMOVED_ATTENDEES INDICESparameters must be based on existing contacts indexing in the Address Book. - Note that the indexes are separated by spaces.
- Each of the optional fields can only be specified at most once.
e.g.update -i 1 -n Birthday Party -n Dinner Party -a 1 -a 2is an invalid command. - If you leave any trailing options but pass no arguments into them, they will be treated as part of the argument for the previous option, which is likely not what you intended to do so.
E.g.update -i 1 -n Billy's School Musical -a 1 2 -lis an invalid command, as the trailing-l(location) flag is treated as an index, since no location string was passed as an argument into it.
Valid Example (One field updated):
update -i 1 -l NUS UTownonly updates the location of the first event toNUS UTown.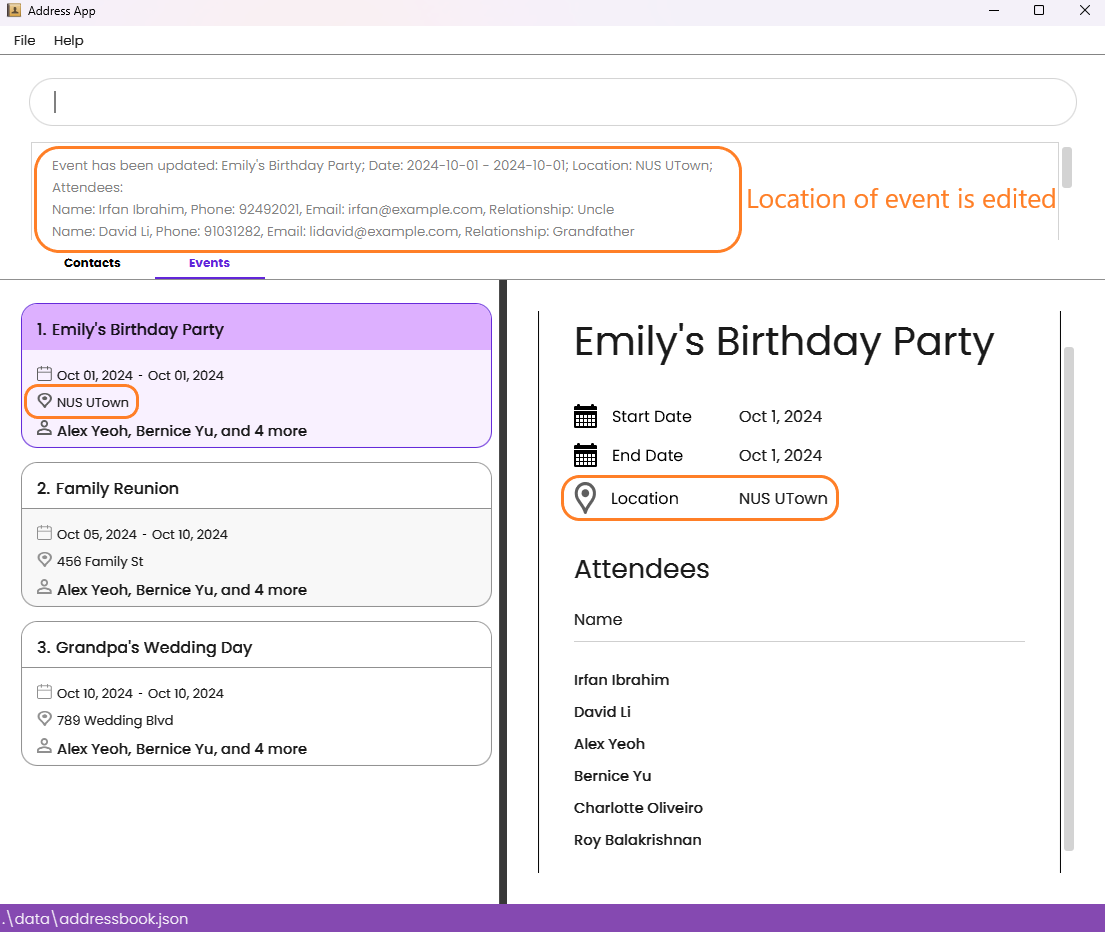
Valid Example (Multiple field updated):
update -i 3 -n New Year's Party -sd 2025-01-01 -ed 2025-01-02 -l Marine Parade Road #12-34 -r 3 6updates the 3rd event, reflecting all the provided details.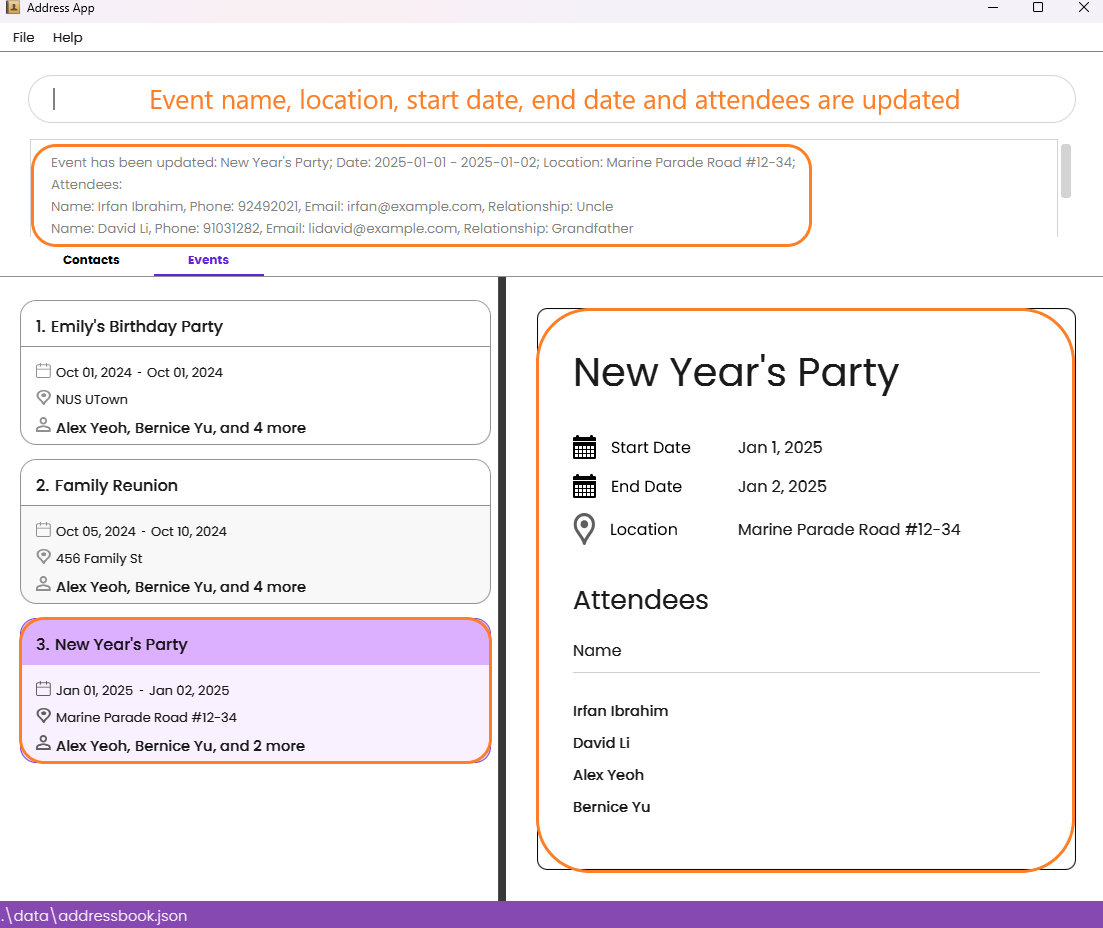
Invalid Example:
update -i 3 -n New Year's Party -n Christmas Celebration -a 1 2 -a 4 5- This command will result in the following error message since the optional fields
-nand-aare specified more than once.

Cancelling Events ❌
Format:
cancel INDEX
- Deletes the event at the specified
INDEX. - The index refers to the index number shown in the displayed event list.
- The index must be a positive integer 1, 2, 3, …
⚠️ Warning: This action cannot be undone, no confirmation message is displayed! You will have to use
eventcommand to add the event again.
Valid Example:
list -efollowed bycancel 1deletes the 1st event in the address book.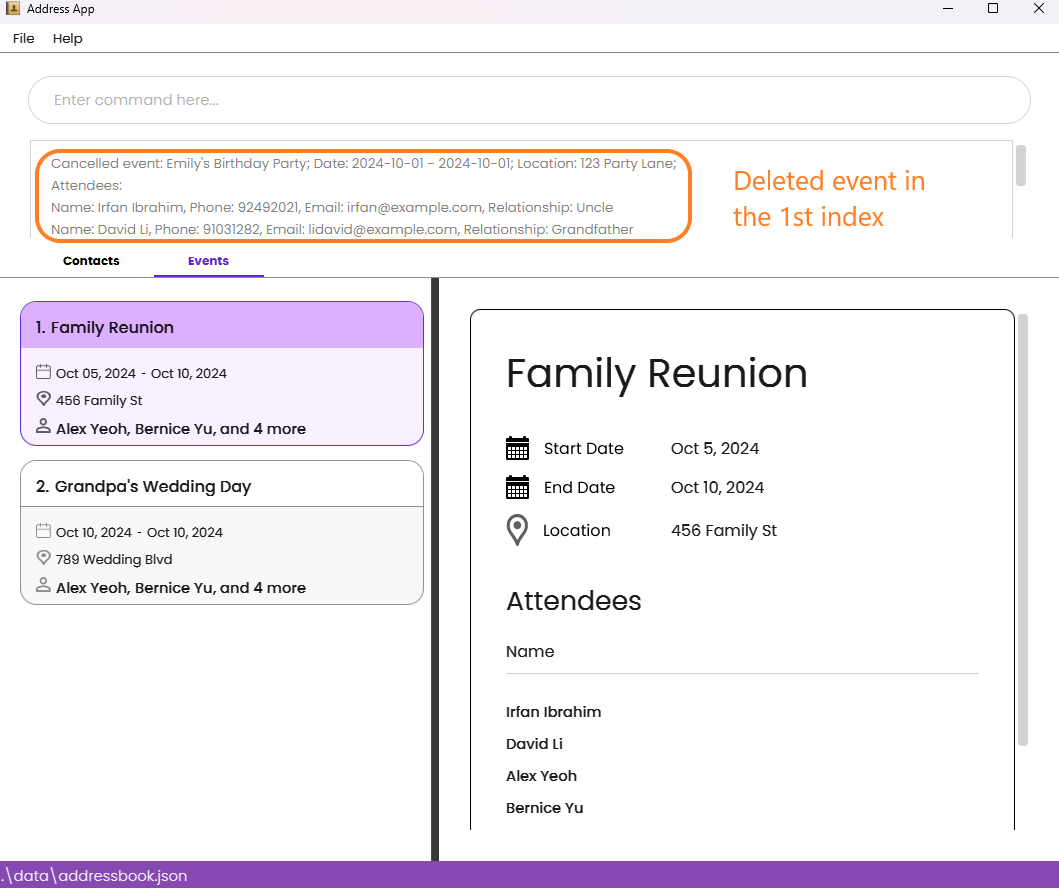
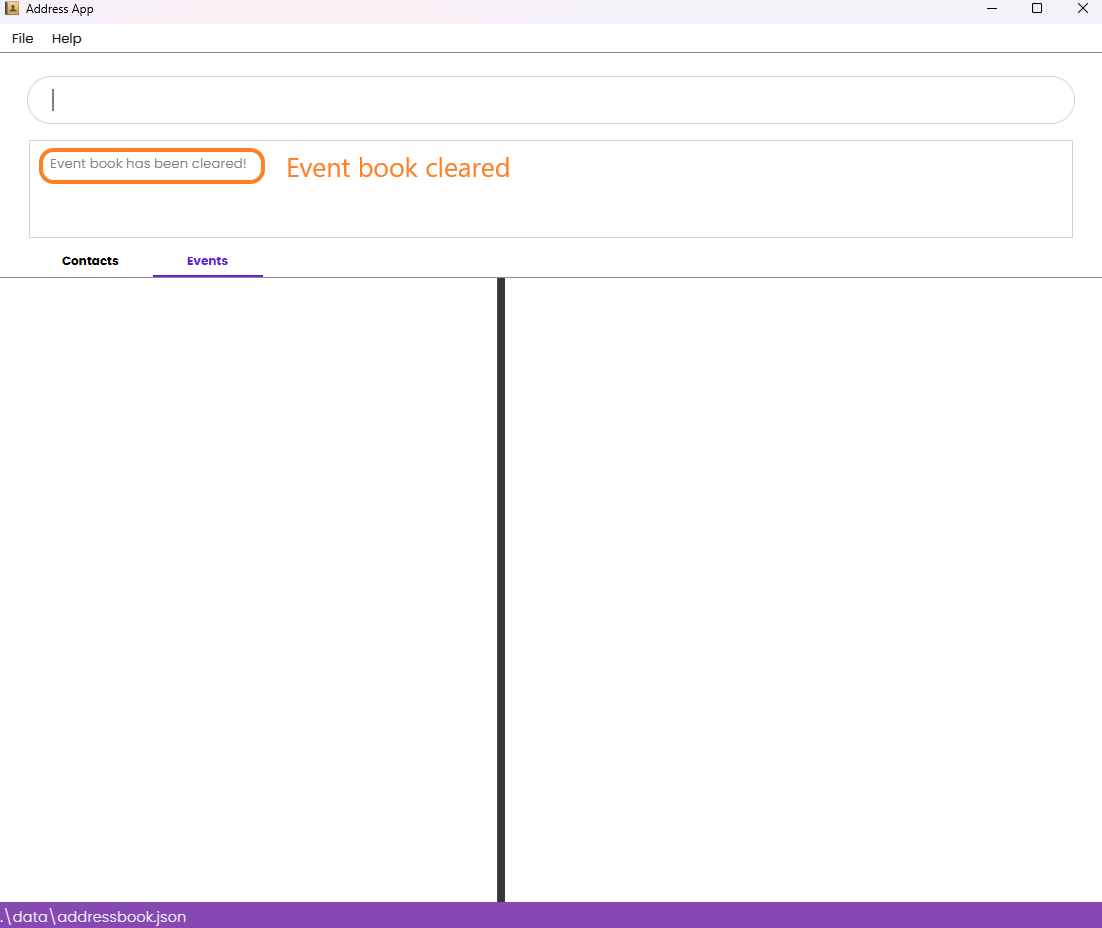
Clearing All Events 🗑️
Format:
clear -e`
- Clears all events from the event book.
⚠️ Warning: No confirmation message is displayed. This action is irreversible, you will have to use
eventcommand to add all the events again.
FAQ
Q: How do I transfer my data to another Computer?
A: Install the app in the other computer and overwrite the empty data file it creates with the file that contains the data of your previous LegacyLink home folder.
Known issues
- When using multiple screens, if you move the application to a secondary screen, and later switch to using only the primary screen, the GUI will open off-screen. The remedy is to delete the
preferences.jsonfile created by the application before running the application again. - If you minimize the Help Window and then run the
helpcommand (or use theHelpmenu, or the keyboard shortcutF1) again, the original Help Window will remain minimized, and no new Help Window will appear. The remedy is to manually restore the minimized Help Window. - When creating 2 or more events that have the same name, start date, end date, and location, it is possible for these events to have attendees which are subsets for each other, but not equal to each other. The remedy is to implement a more sophisticated duplicate event detection system to enhance user experience in the future.
- Imprecise error message for invalid index in
editcommand. Currently, the error message for invalid index such as-1(negative numbers),0and integer overflow is an invalid command instead of an index out of bounds. This is a known issue and will be addressed in an upcoming update to ensure that users receive more accurate and specific error messages when encountering invalid index values. - Truncation of text in the GUI. fields with lengthy text, such as long names and address, can sometimes be truncated in the GUI. To avoid this, you can adjust the size of the window by dragging the sides to enlarge the window.
- Delay between updating of UI and updating of contact information. You may notice that the UI is not immediately updated upon executing commands such as
editordelete. You may have to refresh the UI by clicking on the person/event card again to see the updated person/event information.
Command summary
| Action | Format, Examples |
|---|---|
| List Persons | list -p |
| Add Person | add -n NAME -p PHONE_NUMBER -e EMAIL -rs RELATIONSHIP e.g., add -n James Ho -p 22224444 -e jamesho@example.com -rs Brother |
| Delete Person | delete INDEXe.g., delete 3 |
| Edit Person | edit INDEX [-n NAME] [-p PHONE_NUMBER] [-e EMAIL] [-rs RELATIONSHIP]e.g., edit 2 -n James Lee -e jameslee@example.com |
| Find Person | find KEYWORD [MORE_KEYWORDS]e.g., find James Jake |
| Clear Person Book | clear -p |
| Add Event | event -n EVENT_NAME -sd EVENT_START_DATE -ed EVENT_END_DATE -l LOCATION -a ATTENDEES e.g., event -n Birthday Party -sd 2023-10-15 -ed 2023-10-15 -l Home -a 1 2 3 |
| Cancel Event | cancel INDEX e.g., cancel 1 |
| Edit Event | update -i INDEX [-n NEW_NAME] [-sd NEW_START_DATE] [-ed NEW_END_DATE] [-l NEW_LOCATION] [-a NEW_ATTENDEES_INDICES] [-r REMOVED_ATTENDEES_INDICES] e.g., update -i 3 -n New Year's Party -sd 2025-01-01 -ed 2025-01-02 -a 1 2 4 5 -r 3 6 |
| List Events | list -e |
| Clear Events | clear -e |
| Help | help |
| Exit | exit |